Social Login Providers
Social login providers are supported as part of the Single Sign On (SSO) feature, which is available on all plans.
Support is included for the following providers:
- Microsoft
All providers are enabled by default, but you can configure which providers are enabled in organization settings.
Please note that you cannot use zero click SSO alongside social login providers.
If you'd like to use the WordPress Plugin with social login providers enabled, you can use advanced settings while syncing (see here).
How it works
Once enabled, users can login using their account with the provider (e.g. Google).
With each of the providers, we use the following information:
- Name (to suggest a username and nickname)
- Email address (to allow the user to login via their email, if they forget their username)
- Picture (user can opt not to use the picture during registration)
During the registration process, users will be able to select what username, nickname, and profile photo they'll use in the chat.
Using custom credentials
Using custom credentials is entirely optional, but provides a few benefits:
- Allows you to have access to emails under accounts which authenticate with a provider using custom credentials in Manage Accounts
- Allows you to have access to the user ID returned by the provider under accounts which authenticate with a provider using custom credentials in Manage Accounts
- Users will see your details instead of ours when prompted on whether they would like to share their account data
To use your own credentials, you'll need to apply for a developer account and create an application for each provider you'd like to use.
We've provided instructions below for each provider.
Please note that some providers have an approval process, which means that it could take a few days before your application is approved.
In the meantime, you can of course use our credentials until you've got your own.
Once you have your credentials, go to the Organization Settings page, click on SSO, and check the box for "Use Custom Credentials" for each provider, and enter the information and save settings.
Google
Click here to get started. You may need to create a new project if you don't already have one.
Select a project from the navigation bar up top, or create a new project.
Once your project is created, click on "OAuth consent screen" in the sidebar, and then click on External, then click on Create.
You'll need to fill out the details here as follows:
- App Name -- we'd suggest using your company name in the application name followed by chat, e.g. Example Chat
- User support email -- include an email address where users can contact you if they need help
- App logo -- we don't recommend adding this as the requirements for allowing anyone to use your app are more strict when you add a logo
- Application homepage -- use your organization's homepage URL
- Application privacy policy -- use your organization's privacy policy URL
- Application terms -- use your organization's terms of service URL
- Authorized domains -- enter minnit.chat here as well as your organization's domain
Hit Save and Continue, and you'll now be taken to a page where you can configure the scopes.
Scopes define what permissions you're requesting from users to access their data.
Click on "Add or remove scopes", and check the boxes for .../auth/userinfo.email, .../auth/userinfo.profile, and openid, and click on Update below.
Click Save and Continue to proceed again.
You'll now be taken to a page where you can add test users -- you can input your own email here to test the app if you wish.
Click Save and Continue again, and it'll take you to a summary page where you can review all of the settings for the consent screen.
Now that you've configured the OAuth consent screen, you'll need to click on "Credentials" in the sidebar, and then click on Create Credentials, and select OAuth client ID.
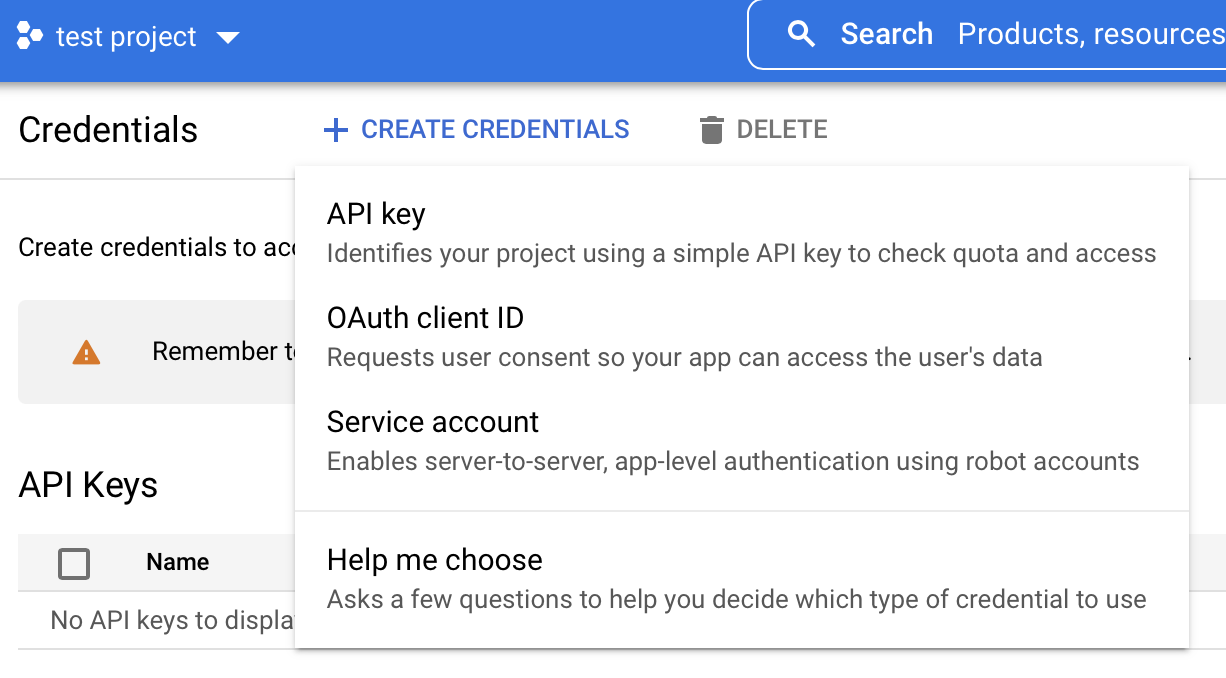
You'll now be taken to a page where you can select the application type.
Select Web Application from the dropdown.
You'll need to enter the authorized redirect URI here.
To find this URL, open a new tab and go to organization settings, then click on SSO, then check the box for "Custom Credentials" for Google.
Keep this tab open -- you'll need to enter the client ID and secret from here.
Go back to the previous tab, and enter the authorized redirect URI, and click Create to proceed.
Once done, you'll receive your credentials
You can now copy the client ID and client secret over to your organization settings -- don't forget to save your settings once you've entered both of these.
You may also want to store the client ID and secret separately for safe keeping.
Your application is still in testing mode now, which means only the test users you've configured can use it.
To allow any user to use your app, click on "OAuth consent screen" in the sidebar, and click on "Publish App" to proceed.
If you've added a logo, you'll need to do the following to have your app verified:
- An official link to your app's Privacy Policy
- A YouTube video showing how you plan to use the Google user data you get from scopes
- A written explanation telling Google why you need access to sensitive and/or restricted user data
- All your domains verified in Google Search Console
If you didn't add a logo, it should show that your publishing stats is set to production -- you're all set from here.
Users should now see your app when authenticating with Google.
LinkedIn
Click here to get started.
Click on "My Apps", and click on "Create App".
Here you'll need to fill out a few fields:
- App Name
- LinkedIn Page -- this will be shown on the consent screen when users choose to share their information
- Privacy Policy URL -- enter your organization's privacy policy URL
- App Logo
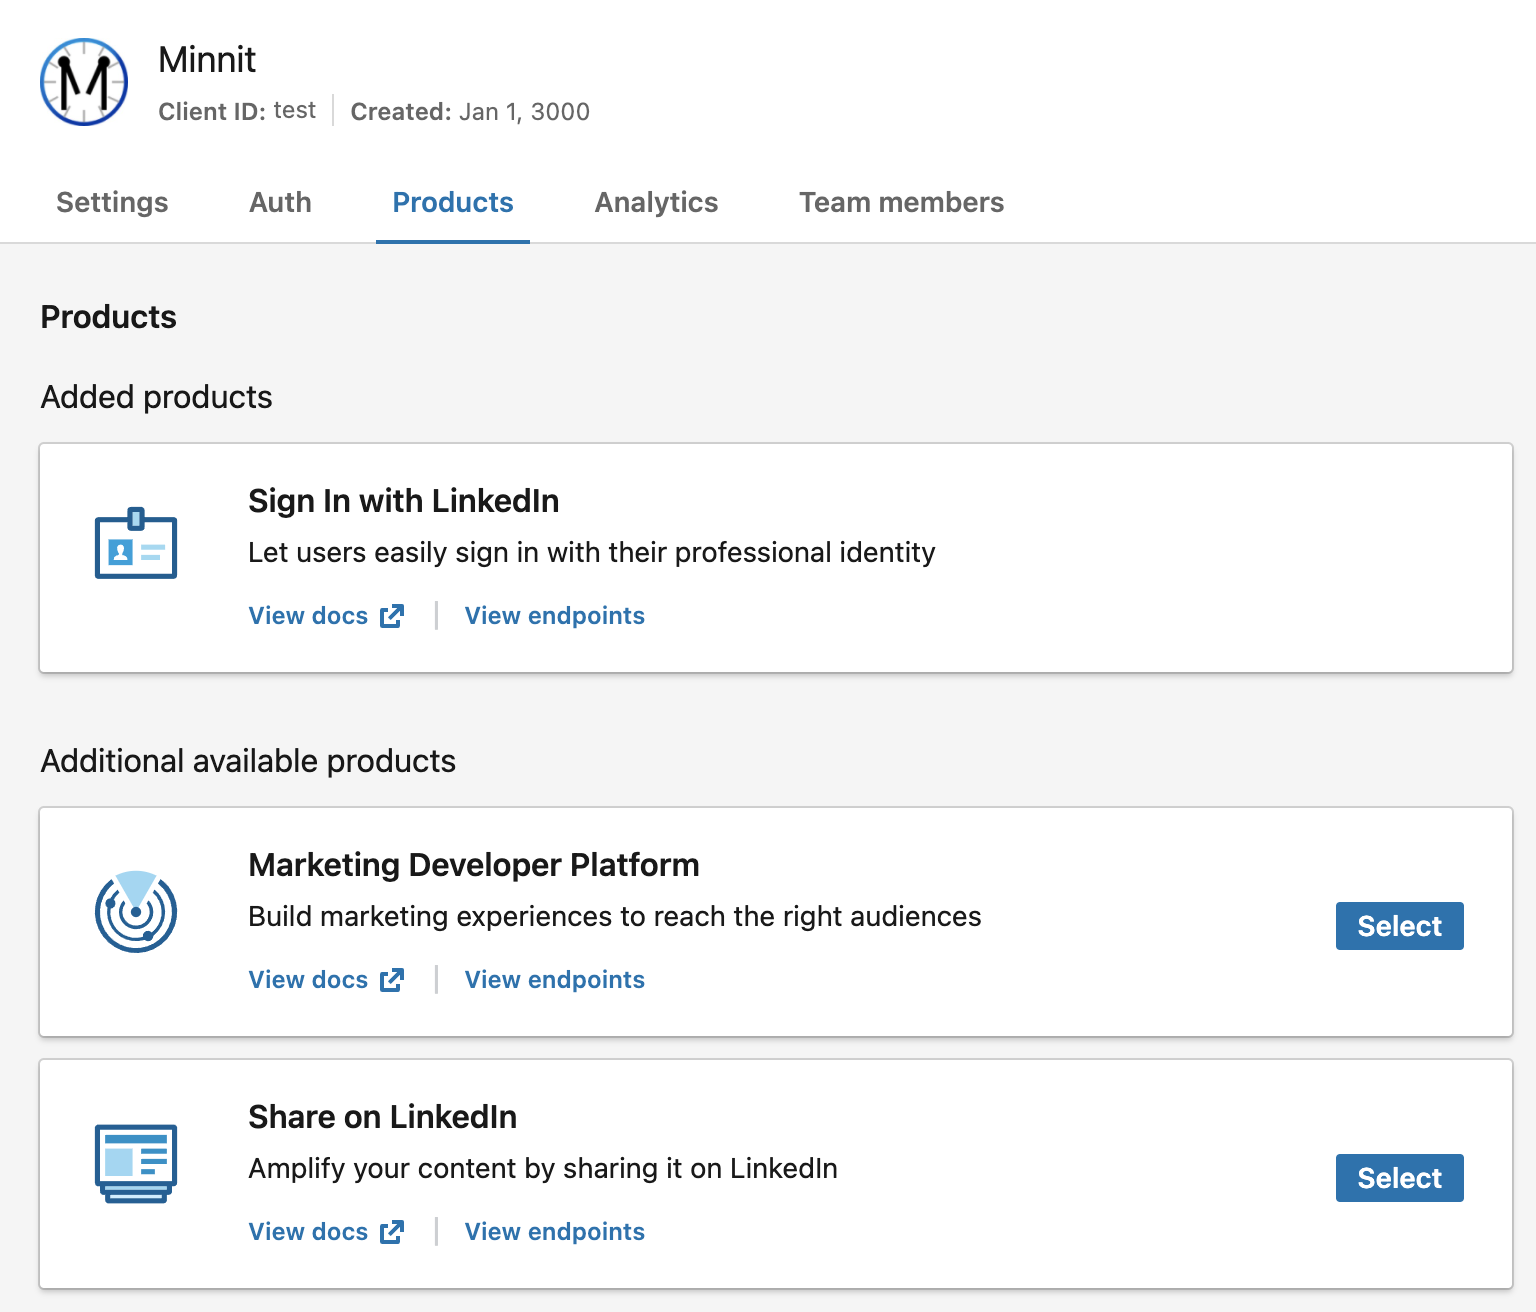
Once your app is created, go to "Products" and add Sign In with LinkedIn as a product.
It may take some time until LinkedIn approves your request.
Once approved, you should see it in your list of products like this:
Once your app is created and you're viewing the app settings, click on "Auth".
You'll need to enter the authorized redirect URI here.
To find this URL, open a new tab and go to organization settings, then click on SSO, then check the box for "Custom Credentials" for LinkedIn.
Copy authorized redirect URI shown on this page.
Keep this tab open -- you'll need to enter the client ID and secret from here.
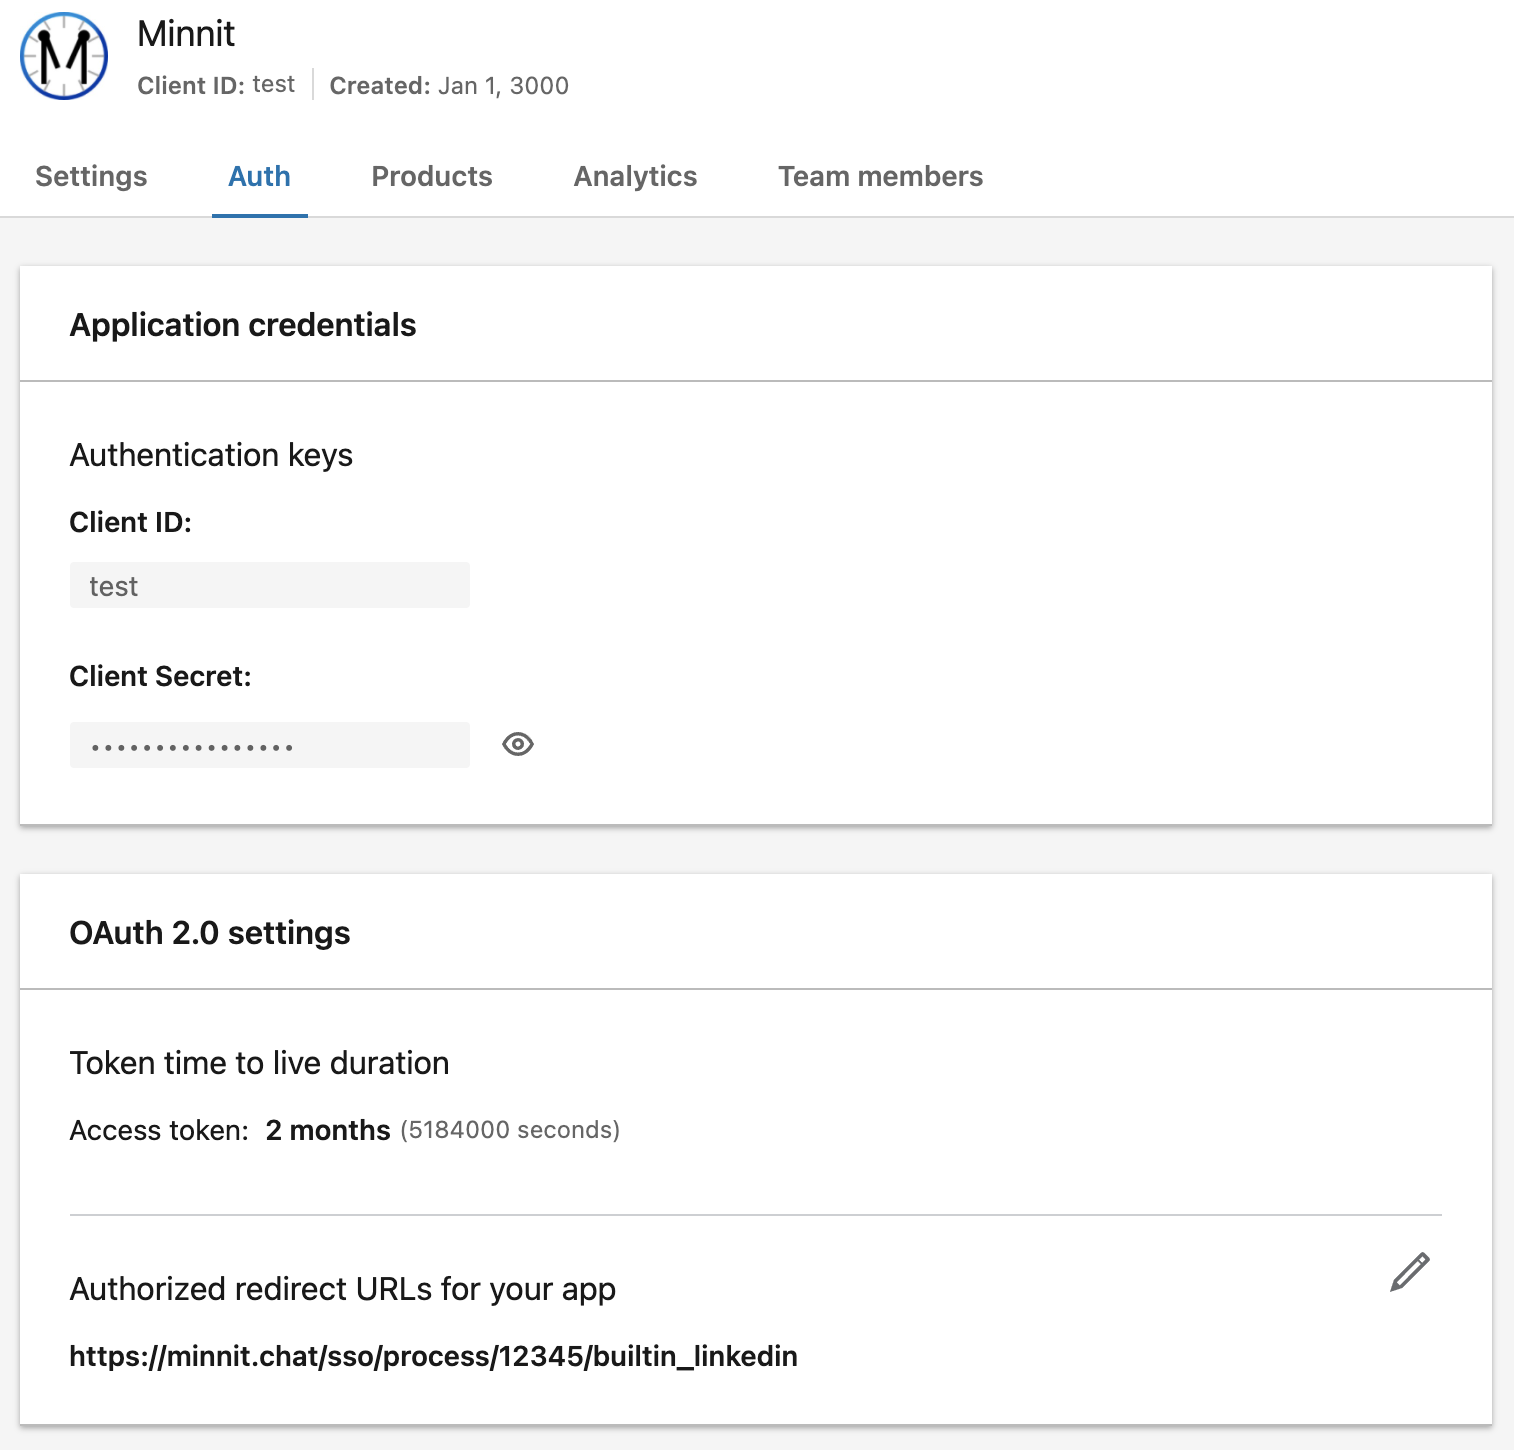
Now, go back to the previous tab where you're editing your LinkedIn settings.
Click on the pencil icon under "Authorized Redirect URLs for your app", and enter the authorized redirect URI you copied from organization settings and add it.
Once completed, it should look like this:
Now, copy the client ID and secret over to the other tab where you had organization settings open.
Once you've saved your changes, you're all set.
Users should now see your app when authenticating with LinkedIn.
Microsoft
To get started with this, you'll need to first sign up for a Microsoft Azure account.
Search for Microsoft Entra ID using the search bar up top.
Click on "App Registrations" in the sidebar, and click on "New Registration".
Here you'll need to fill out a few details:
Name - the name for your application that users will see when they try to login
Supported account types - what types of Microsoft accounts are allowed.
Most likely you'll want to select "Accounts in any organizational directory (Any Microsoft Entra ID tenant - Multitenant) and personal Microsoft accounts (e.g. Skype, Xbox)".
This option will allow any Microsoft account to login, including private Microsoft accounts within organizations and personal accounts.
You can choose to restrict it to Microsoft accounts in your organization only, if your chat is private.
Redirect URI - select Web and follow the instructions below to find the redirect URI.
To find the redirect URI, open a new tab and go to organization settings, then click on SSO, then check the box for "Custom Credentials" for Microsoft.
Copy authorized redirect URI shown on this page.
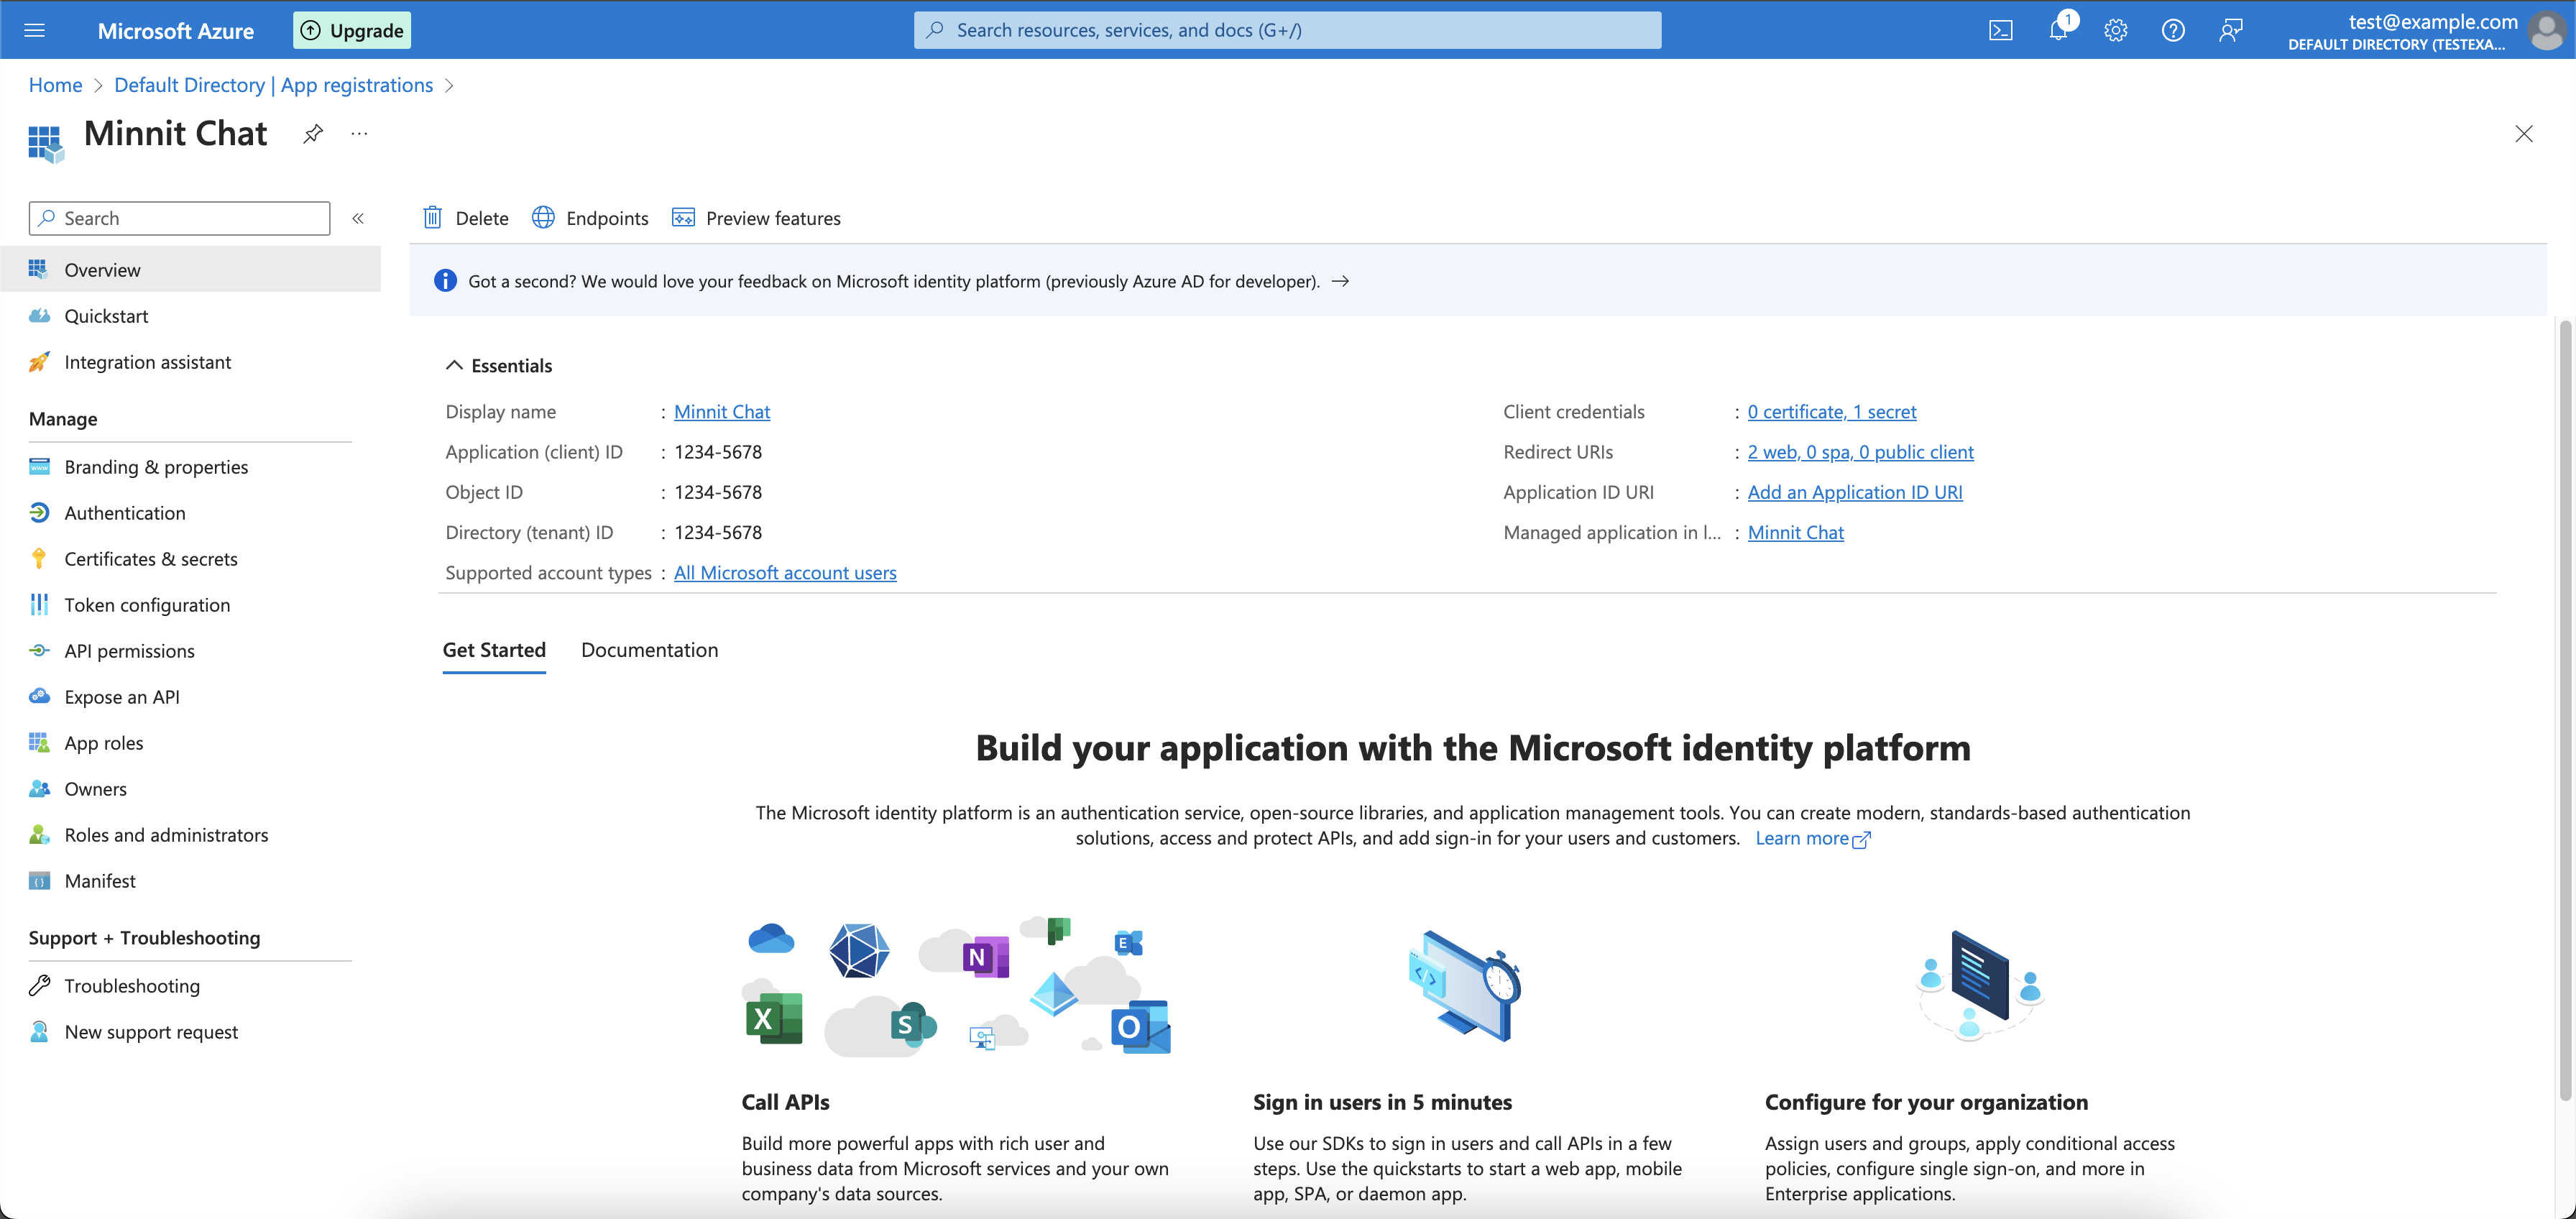
Once all of this is done, click on "Register" and your application will be created.
You should see a page that looks like this once your application is created:
Now you'll need to make a few more changes.
Click on "Branding & properties" in the sidebar.
You can update it with the following settings:
- Home page URL -- use your organization's homepage URL
- Terms of service URL -- use your organization's terms of service URL
- Privacy statement URL -- use your organization's privacy policy URL
Click on "API Permissions" in the sidebar.
Click on "Add a permission", and then make sure the following permissions are added:
- openid
- profile
- ProfilePhoto.Read.All
- User.Read
Click on "Certificates & secrets" in the sidebar.
Click on "New client secret".
Enter a description, and select an expiration date.
This is your API key that allows your users to sign in with Microsoft. It's not currently possible to make a client secret last indefinitely, so you must select an expiration date.
Once added, you'll see the secret ID and value.
In your Minnit SSO organization settings, click on "Use custom credentials" for Microsoft, and copy the value of the secret to the "Client secret" field.
Now you need to find your Client ID.
In the Azure portal, click on "Overview" in the sidebar.
Copy the value for "Application (client) ID" to the "Client ID" field in your SSO organization settings.
Once you've done that and saved your organization settings, you're all set.
Users will now see your app when authenticating with Microsoft.
Facebook
Click here to get started.
Click on "My Apps" or "Log In".
Once you're in the dashboard, click on "Create App" and click on Consumer.
Enter the display name for the app (this is what users will see when logging in with Facebook), enter your app contact email and click on Create app.
Once your app is created, you should see a page like this:
Click on "Set up" under Facebook Login here.
You should see a page asking you what platform you'd like to use -- you can ignore this.
Instead, click on "Settings" under Facebook Login in the sidebar.
You should see a message saying:
Your app has standard access to public_profile. To use Facebook Login, switch public_profile to advanced access.
Click on "Get Advanced Access" here, and search for public_profile as well as email, and click on "Get advanced access" for both of these, and confirm.
In the sidebar, click on "Settings" under Facebook Login again -- you should no longer see the above message about needing advanced access.
Here, make sure that the following options are enabled:
- Web OAuth login
- Enforce HTTPS
- Use Strict Mode for redirect URIs
Now you'll need to get the authorized redirect URI.
To find this, open a new tab and go to organization settings, then click on SSO, then check the box for "Custom Credentials" for Facebook.
Copy authorized redirect URI shown on this page.
Keep this tab open -- you'll need to enter the client ID and secret here later.
Go back to the previous tab, and under "Valid OAuth Redirect URIs", enter the redirect URI you copied from organization settings and save changes.
Once saved, click on Settings in the sidebar, and click on "Basic".
Here you'll need to enter a few things:
- Terms of Service URL -- enter your organization's terms of service URL
- Privacy Policy URL -- enter your organization's privacy policy URL
- User data deletion -- ensure Data deletion instructions URL is selected, and enter your organization's privacy policy URL with
#account-deletionadded at the end, e.g. https://organizations.minnit.chat/12345/page/privacy#account-deletion or https://name.minnit.org/page/privacy#account-deletion - App icon
- App category (we recommend using social network as the app category)
- App purpose set this to "Yourself or your own business"
Once that's done, hit save changes.
Now, switch the app mode from development to Live at the top -- you may need to complete the data use checkup first.
One last thing you'll need to do is copy over your app ID and secret over to organization settings, so you'll use your credentials instead of ours.
Click on "Basic" under "Settings" in the sidebar, and copy the app ID and secret over.
Once you've done that and saved your organization settings, you're all set.
Users will now see your app when authenticating with Facebook.
X (formerly known as Twitter)
Click here to get started.
You'll need to answer a few questions to get a developer account.
If you don't qualify for Essential access, you'll need to fill out a more detailed application to get Elevated access, which can take a few days to get approved.
Once you've got a developer account, you'll be able to create your app.
Before you continue, open a new tab and go to organization settings, then click on SSO, then check the box for "Custom Credentials" for X.
Now, you can go back to the previous tab.
Once you're in the developer dashboard, click on Projects & Apps in the sidebar, and click on your Project.
Scroll down, and click on "Add App" under Apps.

Click on "Create New App", and click on "Production" (you can also keep it in Development mode and change this later), and hit Next.
Enter your App name on the following page, and hit Next.
Copy your API key and Secret over to the custom credentials section in the other tab you have open with organization settings.
Now, go back to the previous tab and click on "App settings" to go to your app settings.
Here, you can add/modify details that users will see when authenticating with the app.
We'd recommend adding an app icon and description here.
Once that's done, click on "Set up" under "User authentication settings".
Enable OAuth 1.0a, and then enable Request email from users (optional).
Under App permissions, leave it as "Read only" -- we don't need to modify any user account details.
Under General authentication settings, you'll need to fill out a few fields:
- Callback URI / Redirect URL -- you can find this in the other tab you have open with organization settings
- Website URL -- enter your organization URL, e.g. https://organizations.minnit.chat/123456 or https://name.minnit.org, or your custom domain
- Terms of service -- enter your organization's terms of service URL
- Privacy policy -- enter your organization's privacy policy URL
Once that's done, hit Save.
In the other tab you have open with organization settings, you should now save your changes.
Once that's done, you're all set -- users should now see your app when authenticating with X.
Why isn't my organization's information shown on the consent screen?
When a user clicks on the button to sign in with a social login provider, they will be required to consent to sharing their account information.
If you aren't using custom credentials, our company name, terms and service and privacy policy will be shown on the consent screen by the provider.
This is required by all providers.
If you'd like to show your company name, terms of service and privacy policy, you'll need to create a developer account with each provider to do so.
You can read more about using custom credentials here.
Why are emails showing as protected in manage accounts?
When a user logs in with a social login provider which uses our credentials, we aren't allowed to share their email address with you.
You can use custom credentials as detailed here to prevent this from happening.
Why does the Sign in with X need so many permissions?
We only need access to the profile information as well as the email address under the account in order to support Sign in with X.
X doesn't offer granular level access for permissions with their V1.1 API.
We are asking for the lowest level of permissions possible (read only access) in order to support this functionality.
By requesting read only access, X automatically includes tweets, accounts followed, muted and blocked in addition to the profile information and email address.
Any data sent to us that isn't needed for Sign in with X functionality is not stored at all.
Note: While X has recently released OAuth2.0 API support, but there is no support yet for requesting access to profile information.
Once this is supported, we'll update our integration.